Virtualization programs, such as those from VMware, bring you closer to the more ideal solution of using both systems at once, but one is always the host and one is always the guest, shown inside a window. But by combining VMware Server with some free software, you can run Windows XP along with Linux, not inside a console window, but completely integrated into the Linux environment.
Required Applications :
1)VMware
2)rdesktop.
Check if rdesktop is Intalled or Not.
For Gnome or Kde :
Open ->Terminal
and Type the command :
rdesktop
If It Show You the Output.(it means rdesktop is Already installed,Other wise it throw an Error :bash command not Found)
First of All Get Serial No. of VMware by Filling the Form Below,it is Free of Charge and Never Expires :-
http://register.vmware.com/content/registration.html
Fill up the Form and You will receive the Serial Number Immediately after Clicking the Submit Button.
Note :->VMware Server Need Serial Number Between the Installation ,So You must copy it and Save it Before Starting VMware Installation.
VMware Installation :
If You r Debian/Ubuntu Users Open Your Synaptic Package Manager :->
System->Administration-> Synaptic Package Manager
Search for VMware-server and rdesktop and Install Them.
Or
If You Are Fedora/OpenSuse Users OPen the Default Package Manager (eg. Fedora Users Can Use Yumex and Suse Users Can Use Yast) Search For VMware-server ad rdesktop and Install Them.
VMware will Ask You for Serial Number Paste the Serial Number which You Have Copied Before,Now Proceed and Finish Installation.
Now Open VMware and Follow The Steps Below :-
- Click Local Host->Now Click Connect.
- select ‘Create a new virtual machine’
- Select Typical and click Next.
- => Next => Next => Select Windows Xp (or whatever Windows versions you want to install )
- => Next => Enter a name and select a location for the Virtual Machine File (It contains the virtual harddisk, so it needs quite some space, Min.
- 3 GB, but I would recommend 8+ GB )
- => Next => Select Network type. Select NAT,Click Next,
- => Next => Choose the size for the Virtual Disk.
- => Next => Finish
It will Take Few Minutes to Create Virtual Machine ,When it is Created Follow the Steps Below.
Now we can start the newly made virtual machine and the install of Windows!
- Start the virtual machine
- Hopefully it detects your Windows install CD and will start the installation! If it won’t boot from the CD, stop the virtual machine and check/change the preferences for the virtual machine regarding the CD drive
- Now Install WIndows To it,There is No Need To explain How to Install Windows.
Now Windows Will Start Automatically after Installation.
- Now Go to->Control Panel->Click the Switch to Classic View->Now Double Click On System Icon and Go to Remote Tab->Check The Box :-“Allow Users to Connect Remotely to This Computer”
- Now Go to-> Start -> Run and typing regedit. Search for HKEY_CURRENT_USER -> Software -> Microsoft -> Windows -> CurrentVersion -> Policies -> Explorer. Once there, right-click on the right panel and select New -> DWORD Value. Name it NoDesktop, then click on it and change the data value to 1. Close the Registry editor and restart Windows.
- Now Create a User Account.Go to Control Panel->Click user accounts icon ->Click On Create a New Account ->Give User name when Required->Create a Password and Close the User Account Window.
- Go to Control Panel->Click on Network Connections->Single Click The Local Area Connection Icon and in the Left Side ,You Will See the Ip Address, Note it Down somewhere because you will need it Later.
- Next, install SeamlessRDP from within your Windows virtual machine. Open Internet Explorer and Download Seamlessrdp.zip From Here. Create a directory under C:/ and Name it to seamlessrdp and Now Double Click The Downloaded Seamless Zip File .Copy the three files into the Newly Created directory seamlessrdp ( you’ll use seamlessrdpshell.exe later).
- Now install the VMWare tools. This will speed up your Windows responsiveness
- Make sure your Windows Virtual Machine is Running and visable/selected. (Not in FullScreen)
- Go to the VM menu (on the top in the VM Server Console)
- Select Install VMWare Tools.
This will start a installation wizard in your Windows Environment. Just install the stuff and you will have better mouse and system responsiveness.
CTRL + ALT will release the mousecursor from the virtual machine
CTRL + ALT in FullScreen mode will get you out of the FullScreen.
You can Suspend a running virtual machine. this way it will start very fast the next time you need it.
To have sound support, add a sound device in the virtual machine settings.
Now Just Log off Windows and Close the VMware Server window.
(Note :Don’t Shut Down Windows ,it will Remains Running in the Background ,after Closing the VMware Server Window) .
Finally :->
Create a Shortcut on your linux desktop :Right Click On Desktop->Create Launcher-> Name it whatever you like and in the Command Write the Following Text.
rdesktop -A -s ‘c:\seamless\seamlessrdpshell.exe c:\windows\explorer.exe’ windowipaddress -u windowusername -p windowspassword
Where windowipaddress is the Address Which You have Noted Earlier windowusername is the name of the user account ,which u have created earlier and windowspassword is the Password of the User Account ,like an example :
rdesktop -A -s ‘c:\seamlessrdp\seamlessrdpshell.exe c:\windows\explorer.exe’ 192.168.156.123 -u Puneet -p theking
That’s it
Now Double Click on The Shortcut .
🙂
Note :Make Sure Disable any Running Firewall in the Linux Machine.
Now Click on the Shortcut Icon on Linux Machine.
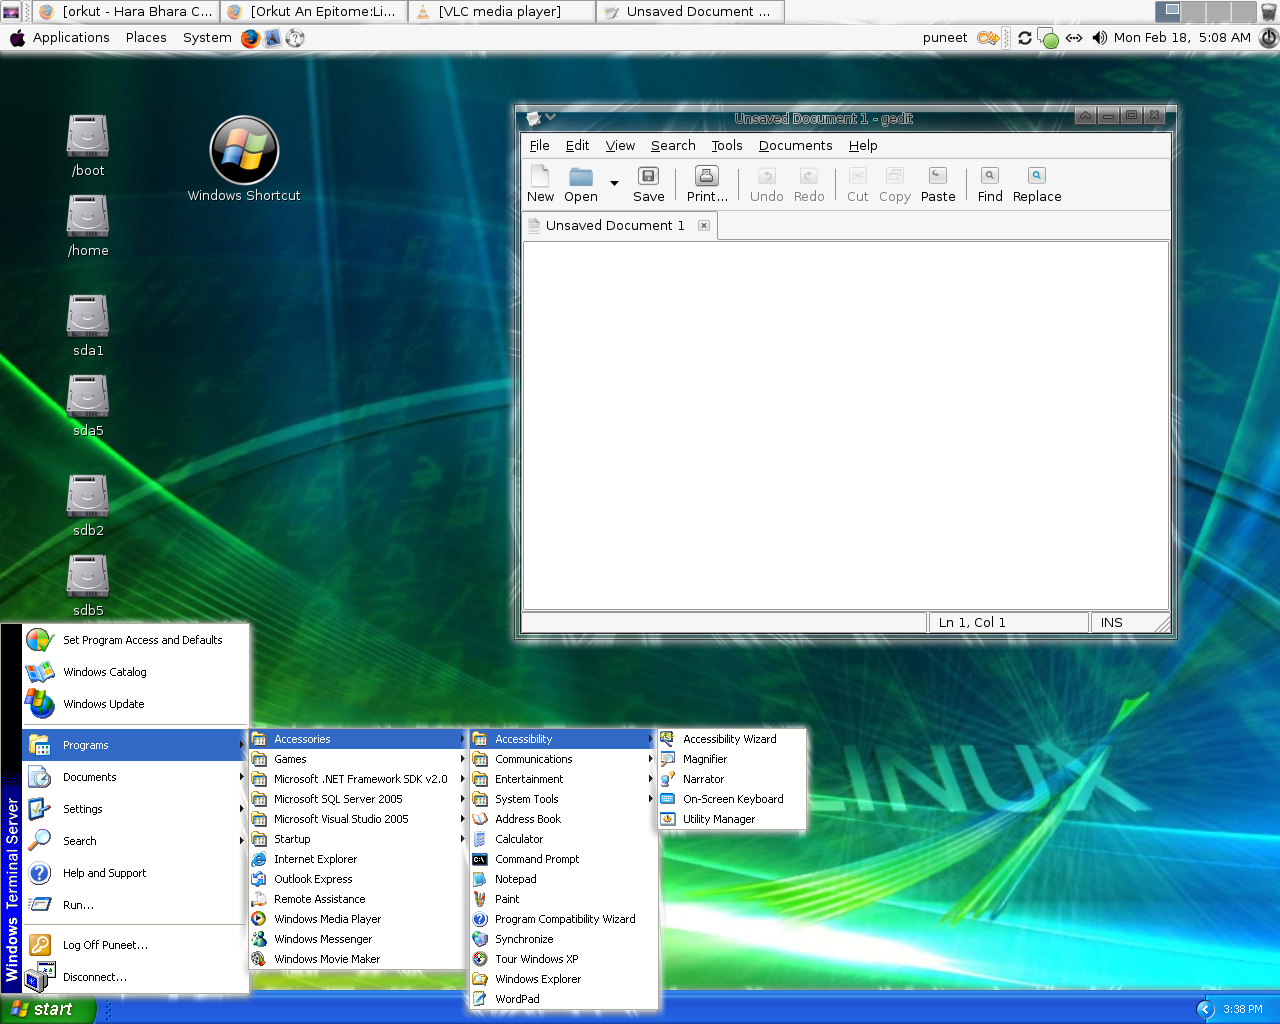
Voila ! After a few seconds, you should have the Windows XP menu bar at the bottom of the screen, and you should be able to launch any application you have installed. You’ve created the illusion that both operating systems are working on the same machine at the same time. Very cool.
This trick doesn’t work with just VMware virtual machines. It also works with Windows clients on your network and other virtual machine software. Simply install SeamlessRDP and configure Windows XP properly so that rdesktop can connect to it.
Click The Screen Shot to Enlarge.
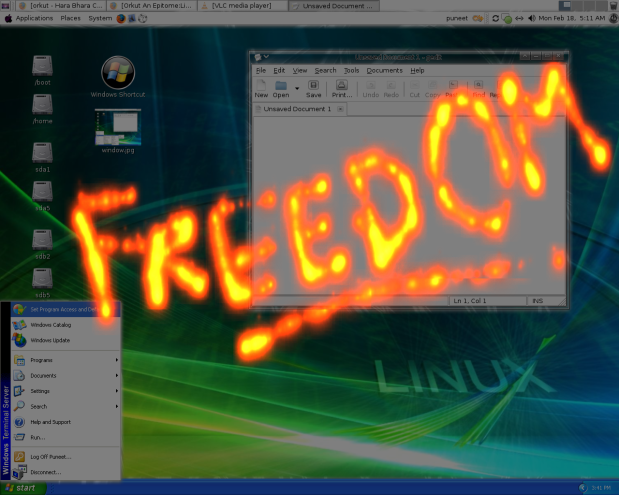
Click The Screen Shot to Enlarge.
Important : Remember Everytime you Restart Your System,The Virtual Machine That Runs in Background will close,so You will have to open VMware Server Console and Start The Windows achine before You can connect to it through the Desktop Shortcut.
Enjoy Linux and Windows Together on One Desktop.
Regards.


 The most common question I get asked whenever I present a public speaking seminar is “Why did you switch to Linux?”Well… for all those who asked, here’s the long winded answer.


